13. Flutter
In addition to the descriptions here, I recorded videos
Flutter is a cross-platform framework, similar to React.
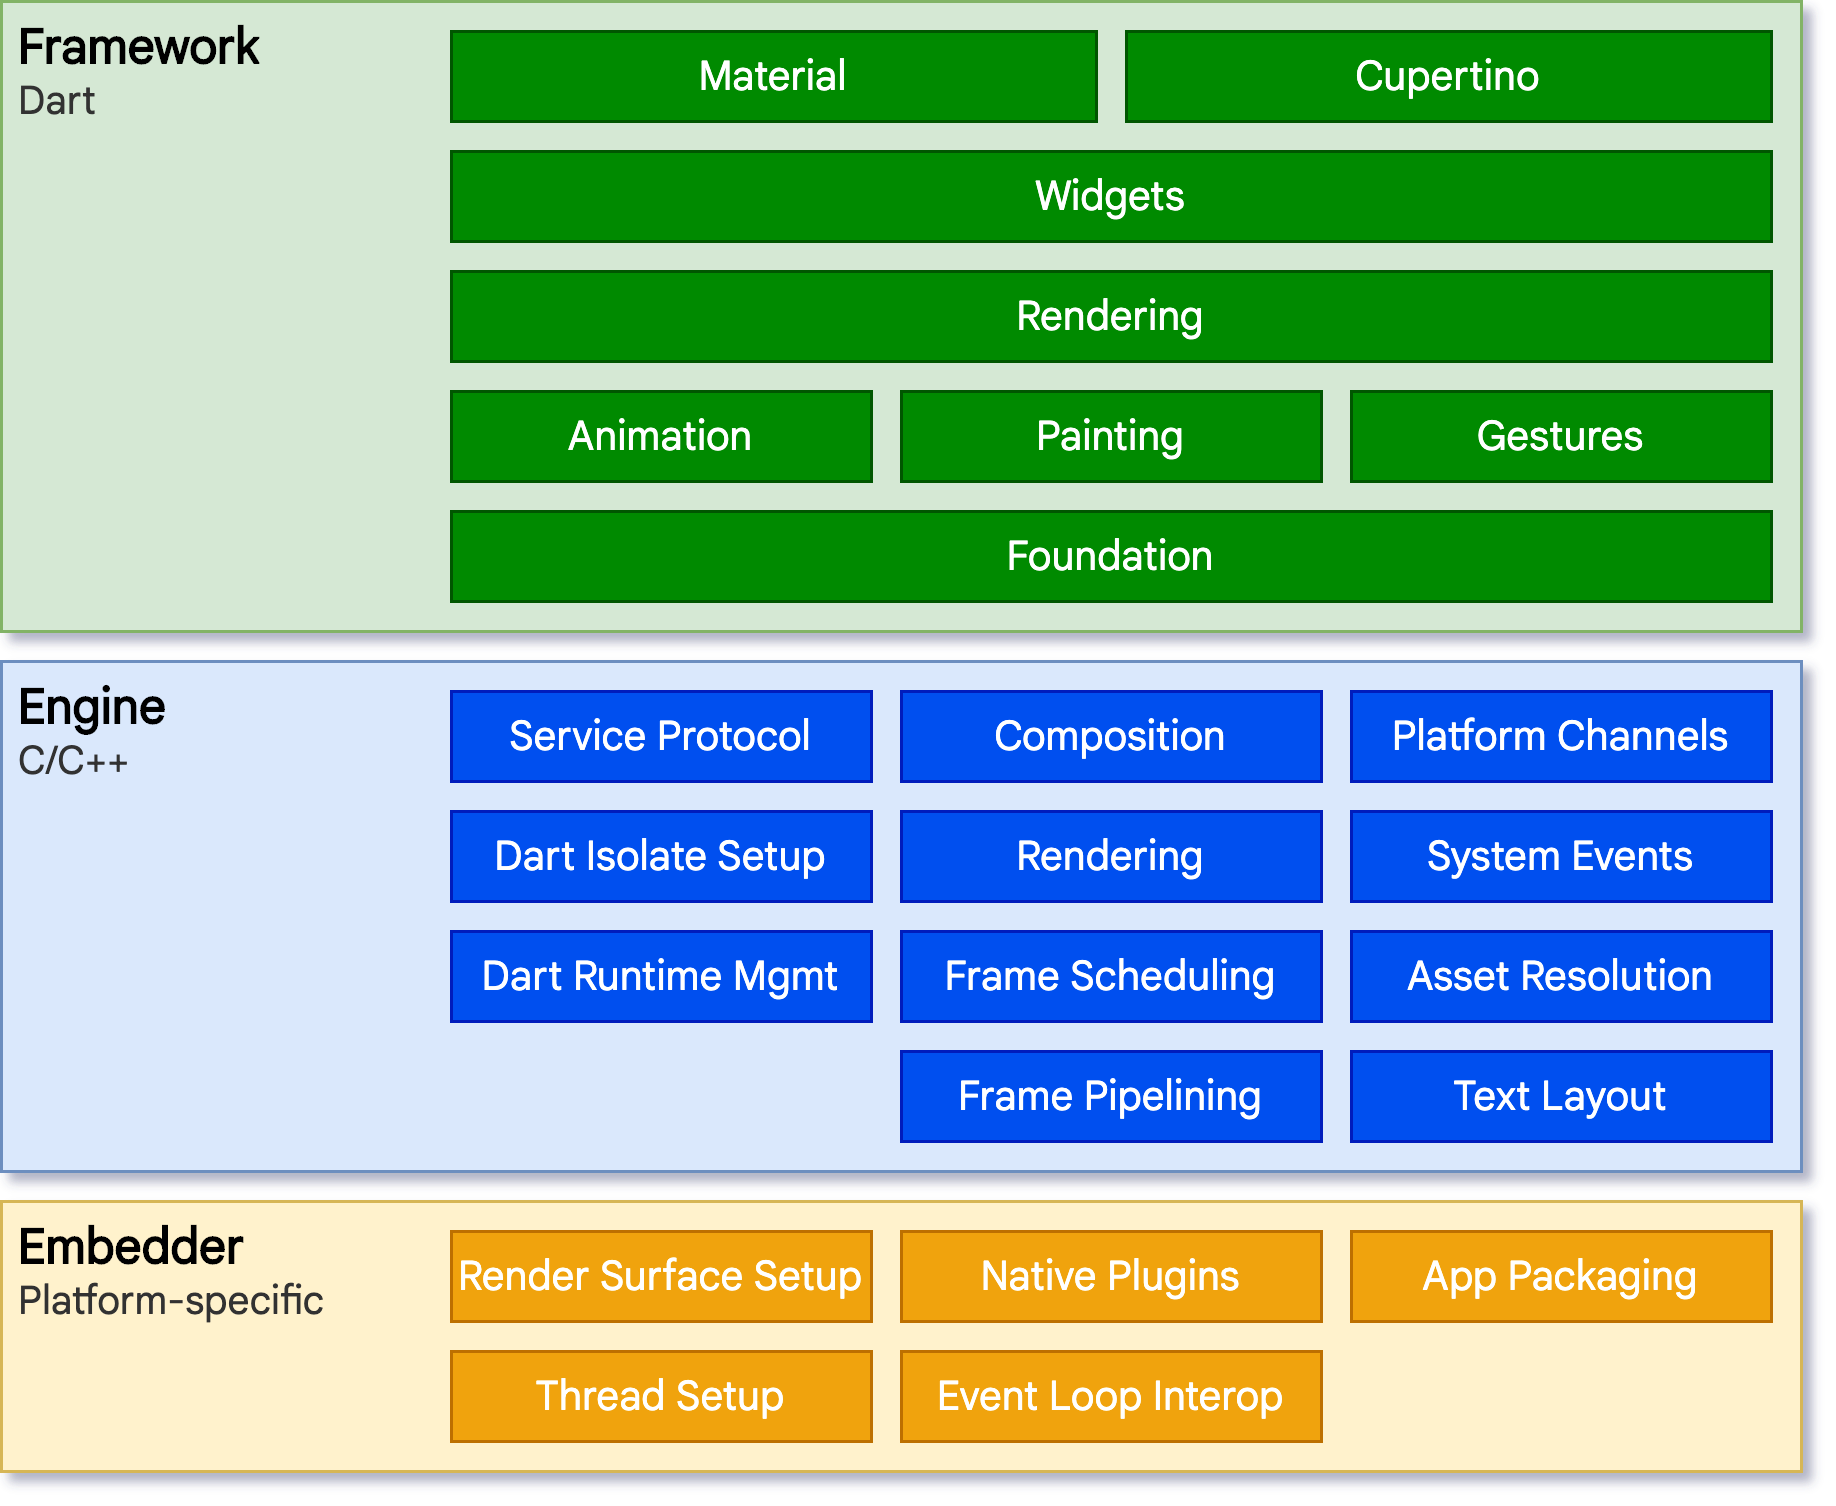
13.1 Architecture
The following figure shows, how Flutter looks under the hood.
13.2 Widgets/Controls
Flutter emphasizes widgets as a unit of composition. Widgets are the building blocks of a Flutter app’s user interface, and each widget is an immutable declaration of a part of the user interface. Everything is a widget, even padding and margin. Widgets are typically composed of many other small, single-purpose widgets.
13.3 Dart
Flutter uses its own language, Dart. Learn what is different to C++. Dart is an object-oriented language, hence you will find many similarities, and it should not be difficult to learn it.
- Everything you can place in a variable is an object, and every object is an instance of a class. Even numbers, functions, and null are objects.
- No new to instantiate a new object.
- Single Inheritance
- All classes implicitly define an interface!
- supports optional parameters
- null safety
- no protected, private by naming convention _, default is public!
- Lists look like arrays.
- Switch works on all types.
13.3.1 Links
13.3.2 Lambdas - Arrow Operator - =>
Lambdas are anonymous functions and are best thought as a mathematical map to, i.e.
(a,b,c) → f(a,b,c)
Here is an example
bool hasEmpty = aListOfStrings.any((s) => s.isEmpty);
13.3.3 Generics
Generics are widely used and make the type of lists or classes and methods in general exchangeable without the need of redefinition. In C++ you have templates. However, there are some differences Comparing Templates and Generics. The following snippets are from Generics.
abstract class Cache<T> {
  T getByKey(String key);
  void setByKey(String key, T value);
}
var names = <String>['Seth', 'Kathy', 'Lars'];
var uniqueNames = <String>{'Seth', 'Kathy', 'Lars'};
var views = Map<int, View>();
T first<T>(List<T> ts) {
  // Do some initial work or error checking, then...
  T tmp = ts[0];
  // Do some additional checking or processing...
  return tmp;
}
13.3.4 General Snippets
// iterable collections
var listOfInts = [1, 2, 3];
var listOfStrings = ['#0', for (var i in listOfInts) '#$i'];
var longWords = allWords.where((w) => w.length > 6).toList().length;
var points = <Point>[]; //List
var addresses = <String, Address>{}; //Map
var counts = <int>{}; //Set
const items = ['Salad', 'Popcorn', 'Toast', 'Lasagne'];
if (items.any((item) => item.contains('a'))) {
    print('At least one item contains "a"');
  }
if (items.every((item) => item.length >= 5)) {
    print('All items have length >= 5');
  }
var found = items.firstWhere((item) => item.length > 5);
var evenNumbers = numbers.where((number) => number.isEven);

// string interpolation
print('Hello, $name! You are ${year - birth} years old.';)

// ternary operator (short if/else)
var visibility = isPublic ? 'public' : 'private';

// optional parameters
int sumUpToFive(int a, [int? b, String title = '']) {...}
// named parameters - are optional unless required states otherwise
void enableFlags({bool? bold, bool? hidden}) {...}
const Scrollbar({super.key, required Widget? child});

// call with
enableFlags(bold: true, hidden: false);

// class
class Point {
  double x, y;
  Point(this.x, this.y);

  static double distanceBetween(Point a, Point b) {...return...}
}
class Person {
  // In the interface, but visible only in this library.
  final String _name;

  // Not in the interface, since this is a constructor.
  Person(this._name);

  // In the interface.
  String greet(String who) => 'Hello, $who. I am $_name.';
}

// records are an anonymous, immutable, aggregate type
var x = ('first', a: 2, b: true, 'last'); // bad example, do not mix unnamed with named!
// access with $n or name like a
print(x.$1) // first
print(x.a) // 2
print(x.$2); // last
13.3.5 Extension Methods
Extension methods add functionality to existing libraries and types. The syntax is the following
extension <extension name>? on <type> {
  (<member definition>)*
}
Try to understand the following examples.
extension on String {
  bool get isBlank => trim().isEmpty;
}

extension NumberParsing on String {
  int parseInt() {
    return int.parse(this);
  }

  double parseDouble() {
    return double.parse(this);
  }
}

var v = '2';
print(v.parseInt()); // Output: 2

if (v.isBlank){...}

extension MyFancyList<T> on List<T> {
  int get doubleLength => length * 2;
  List<T> operator -() => reversed.toList();
  List<List<T>> split(int at) => [sublist(0, at), sublist(at)];
}
extension _MyJsonHelper on Map<String, Object> {
  int? get id => this['id'] as int?;

  String? get name => this['name'] as String?;
}
var json = {
    'id': 100,
    'name': 'Dash',
  };
print("${json.name}'s ID is ${json.id}."); // Dash's ID is 100.
13.3.6 Special Operators
// ? execute right hand side only if not null
String? notAString = null;
print(notAString?.length?.isEven);

// ?? operator
print(nullableString ?? 'alternate');

// and ??= assignment operator, which assigns a value to a variable only if that variable is currently null:
int? a; // a = null
a ??= 3; // a = 3
a ??= 5; // a is still 3

// .. cascade: perform a sequence of operations on the same object, instead of typing querySelector?.text, querySelector?.onclick ...
querySelector('#confirm')
  ?..text = 'Confirm'
  ..onClick.listen((e) => window.alert('Confirmed!'))
  ..scrollIntoView();
Question
- Implement an extension method for String, that makes the first letter of the string a capital letter and returns the given string.
- Use the null aware operator to set a default value for a variable x.
- Define a class (and hence implicitly an interface) for a student.
13.4 General concepts and architecture of your app
In the following we will have a birds view on some patterns and concepts. Make sure, you understand the ideas before you start with the implementation of your app.
13.4.1 Event Driven Programming
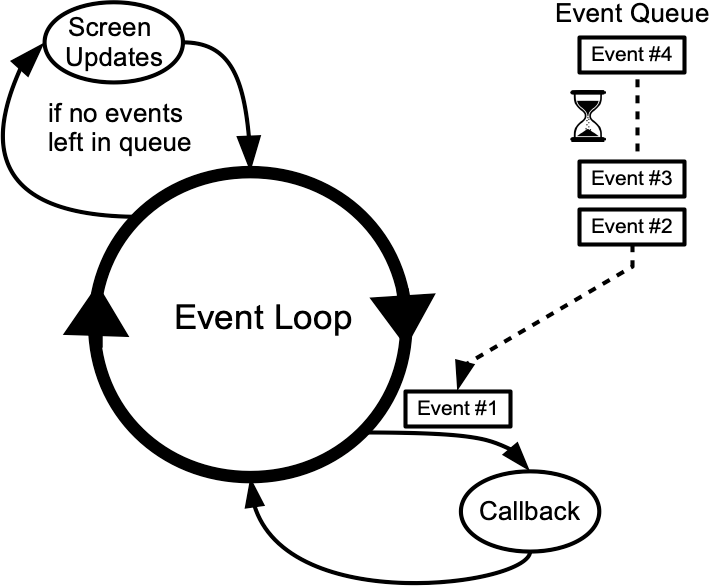
With UIs, you will follow the event driven programming paradigm. There is no linear flow of the program, but users interact with your UI, click an item, swipe to left, go back or do other things. Each action results in an event. You program, how your app behaves, what to do with which event. In the background there runs an event loop, as illustrated in the figure above, that deals with these events.
Your UI consists of many partly nested, partly overlapping elements. Hence, you define what to do and if the event is handled or should be passed to other UI elements. This passing through is also known as tunneling or bubbling. In general, you have
- an event belonging to your UI control/widget, e.g. click event for a button
- an event handler that defines, how a specific event should be handled
"User interactions are represented by event objects that are dispatched to callbacks registered with event handlers. Screen updates are triggered by a similar callback mechanism. The Listenable class, which is used as the basis of the animation system, formalizes a subscription model for events with multiple listeners." 1
13.4.2 Events and Event-Handling
Event Handlers are typically void methods. The parameters passed with an event vary, e.g. for a mouse event I might need the coordinates. Below you will find some simple snippets of default events and simple event handlers in flutter.
Listener(
        onPointerDown: _incrementDown,
        ...
)
...
void _incrementDown(PointerEvent details) {
  x = details.position.dx;
  y = details.position.dy;
  ...
}

ElevatedButton(
  onPressed: () {...}
  ...
)

DropdownButton<Supplier>(
  onChanged: (supplier) async {...}
13.4.3 State
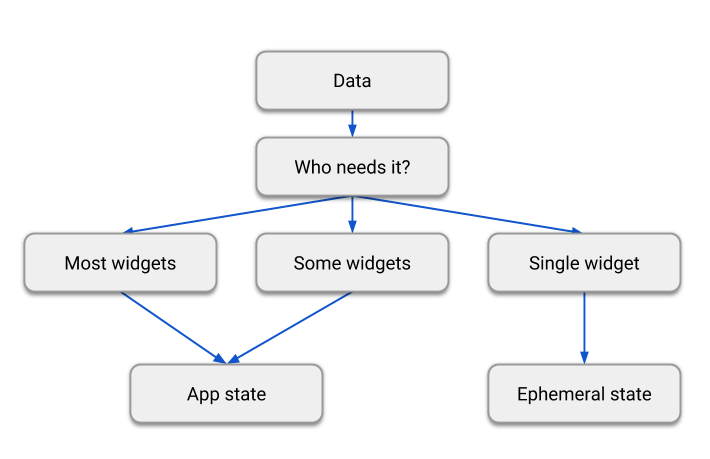
Flutter differs between ephemeral state and app state: "In the broadest possible sense, the state of an app is everything that exists in memory when the app is running." However, many expects are handled by Flutter internally and are not of our concern.
Pressing a button or clicking a radio button might result in a change of your UI. In Flutter changes in the UI, i.e. redrawing the UI are realized by calling the method build. To optimize this, as few widgets as possible should be redrawn. A more suitable definition: “whatever data you need in order to rebuild your UI at any moment in time”.
"Ephemeral state (sometimes called UI state or local state) is the state you can neatly contain in a single widget." That's where stateful widgets are needed, e.g. a TextField, a checkbox or a progress
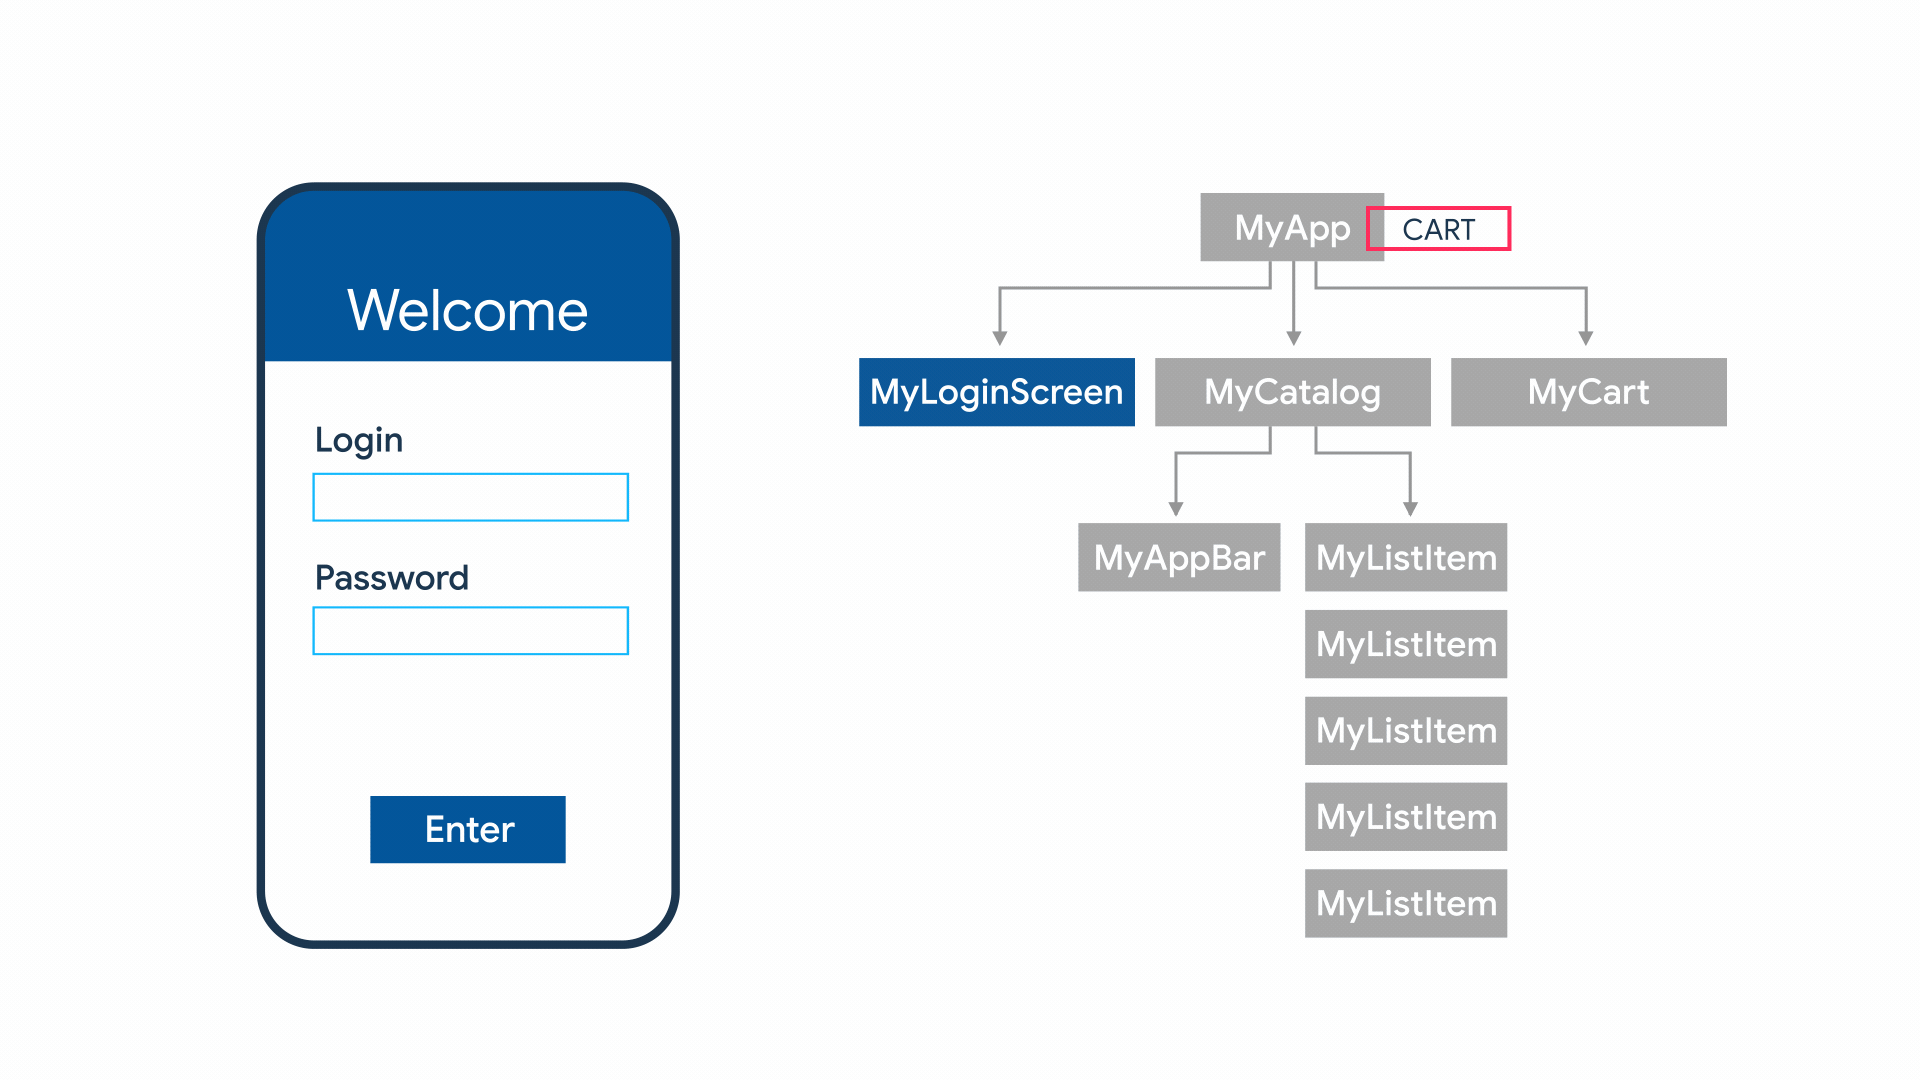
If you think of an app with several widgets and screens the question arises, how to synchronize the state of widgets and where and how to hold the data. This is, where app state in the narrower sense is relevant.
The following figure illustrates the difference of app state and ephemeral state. And may be used as a decision tree, what is needed in which case.
"A widget declares its user interface by overriding the build() method, which is a function that converts state to UI:
UI = f(state)
The build() method is by design fast to execute and should be free of side effects, allowing it to be called by the framework whenever needed (potentially as often as once per rendered frame)."2
As long, as the widgets to be synchronized are on the same screen and share a parent widget, you could pass the data as parameters while building these widgets. However, this is a very strong coupling. The InheritedWidget, see the second video is an easy way to share fields with child widgets and hence share data with all widgets of the same widget tree. Moreover, it may propagate change to all child widgets.

Another simple approach could be to attach the data to the app object or have a singleton which holds all data relevant to the app. However, both approaches are not suitable and lack the requirements of a good software architecture.
From OOAD you know the observer pattern, also known as the publish subscriber pattern. This pattern informs subscribers/observers/listeners of changes. This is precisely, what we need.
There are different approaches to manage app state. We will use Riverpod.
However, as Riverpod might not be easy to get you started, especially, if you do not have any experience with app state, you may store your app state in one class and switch to Riverpod later on.
Question
- Describe the term state in your own words.
- Sketch an app with two screens and some widgets and its data flow and think, in which widget you might need which shared data.
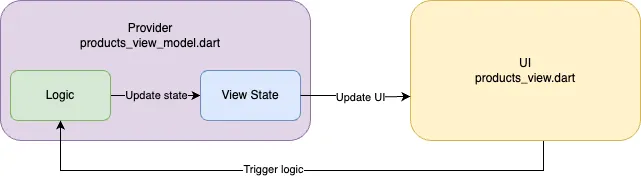
13.4.4 MVVM
Model View ViewModel is a widely used architecture pattern in front end development.
- View: The view defines the user interface. It should be as simple as possible, no logic, no long processes. That is the only place, where we will have widgets and Flutter code.
- Model: The model holds domain data and is the connection to the data layer.
- ViewModel: This is the clue between the model and the view, i.e. the data provided by the model might be formatted nicely for the view, the events of the UI will be mapped to methods of the model, and it handles any logic issues regarding the view.
In Flutter this may be realized in the following way
13.4.5 Repository Pattern
The repository pattern is very common in mobile development. Many apps fetch their data from a server, mostly using an API. In addition, the data might be stored locally -- for example for offline capable apps. If you think of a layered architecture, the domain layer and view should not contain logic, where and how to fetch the data, that is the job of the data layer. Below you find the typical three layered architecture.
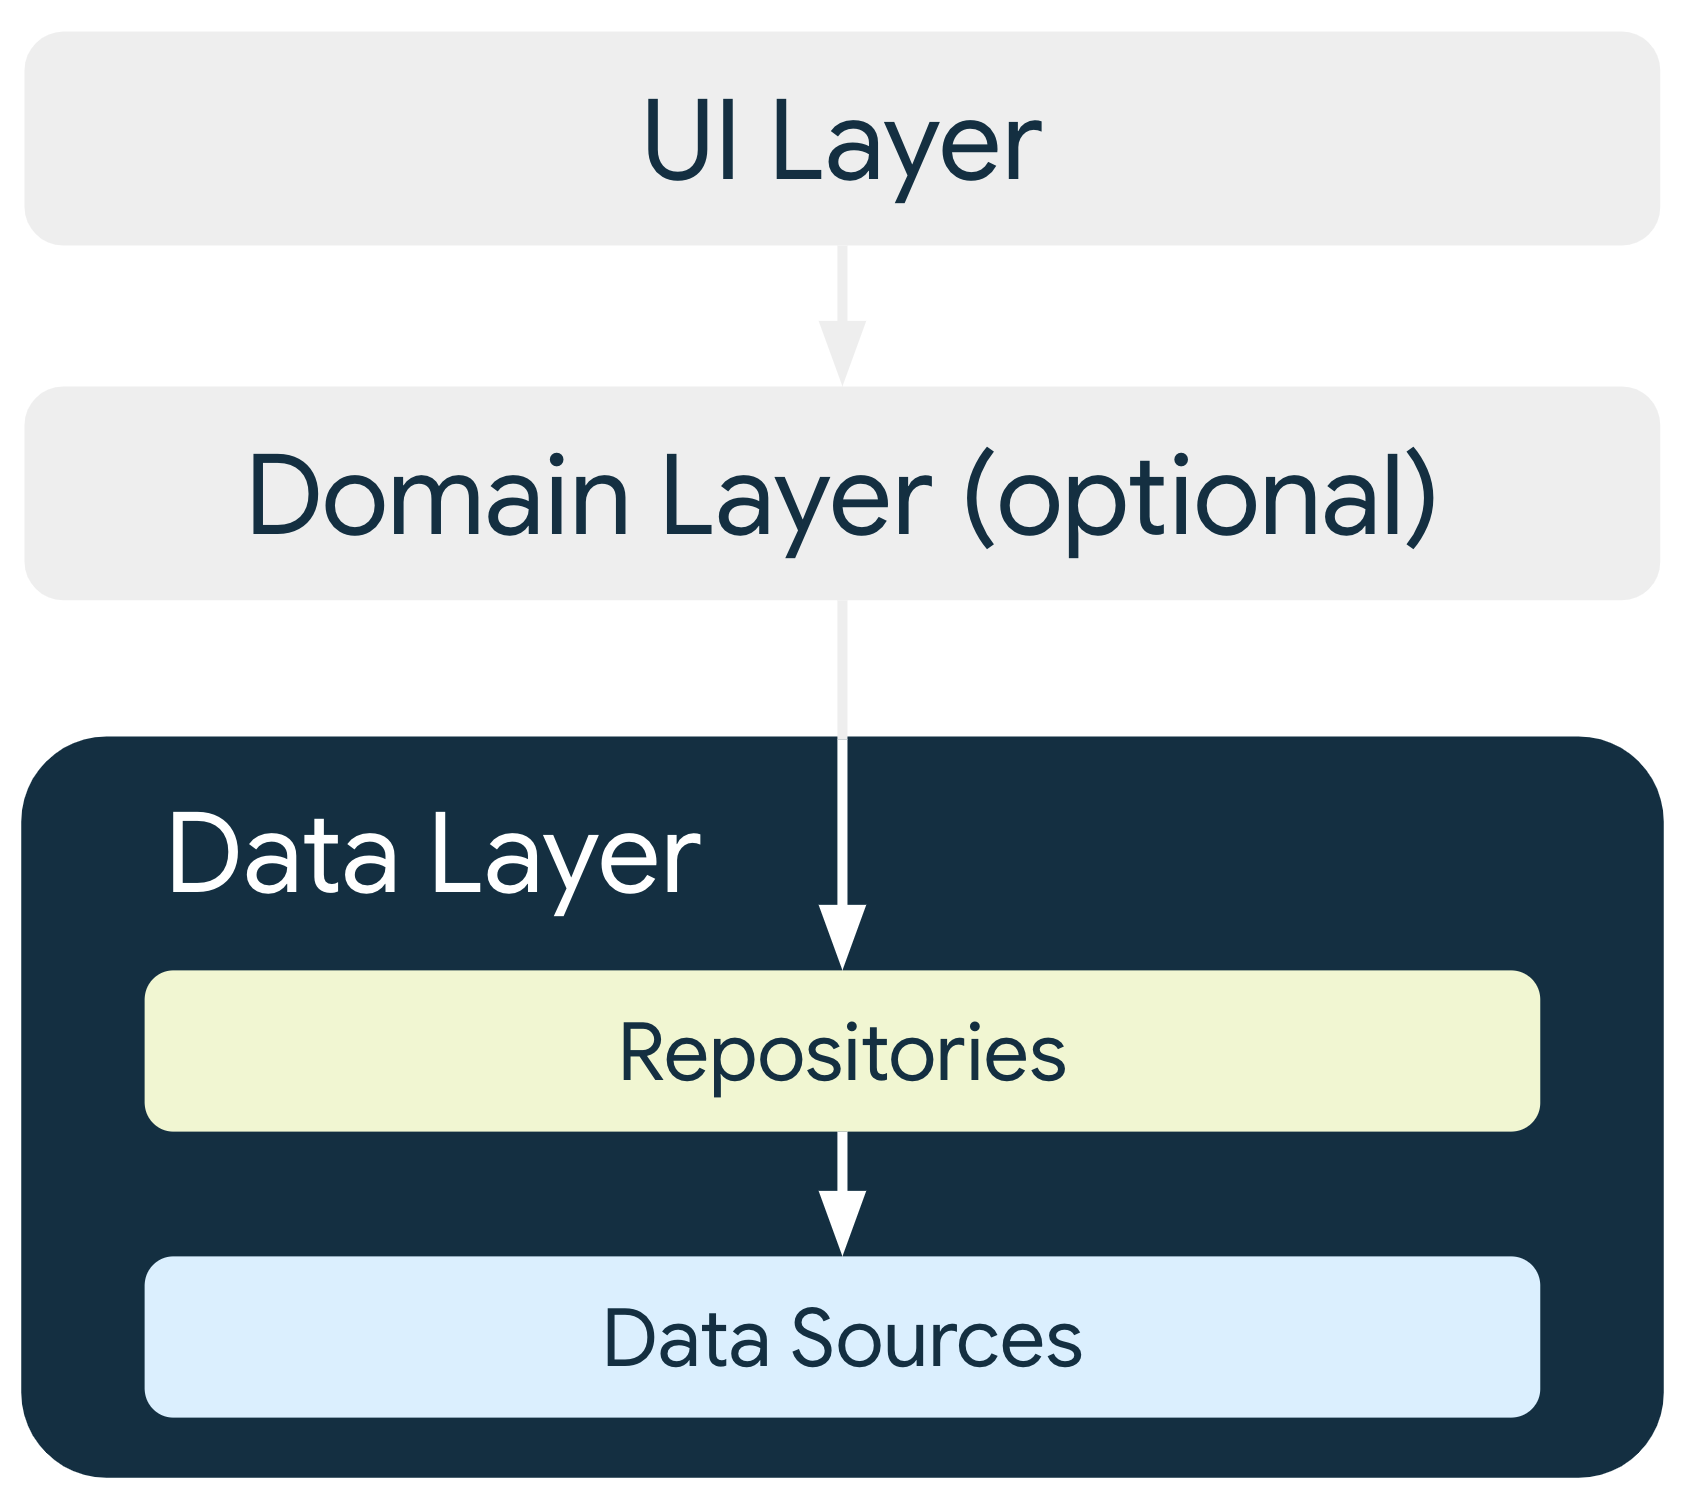
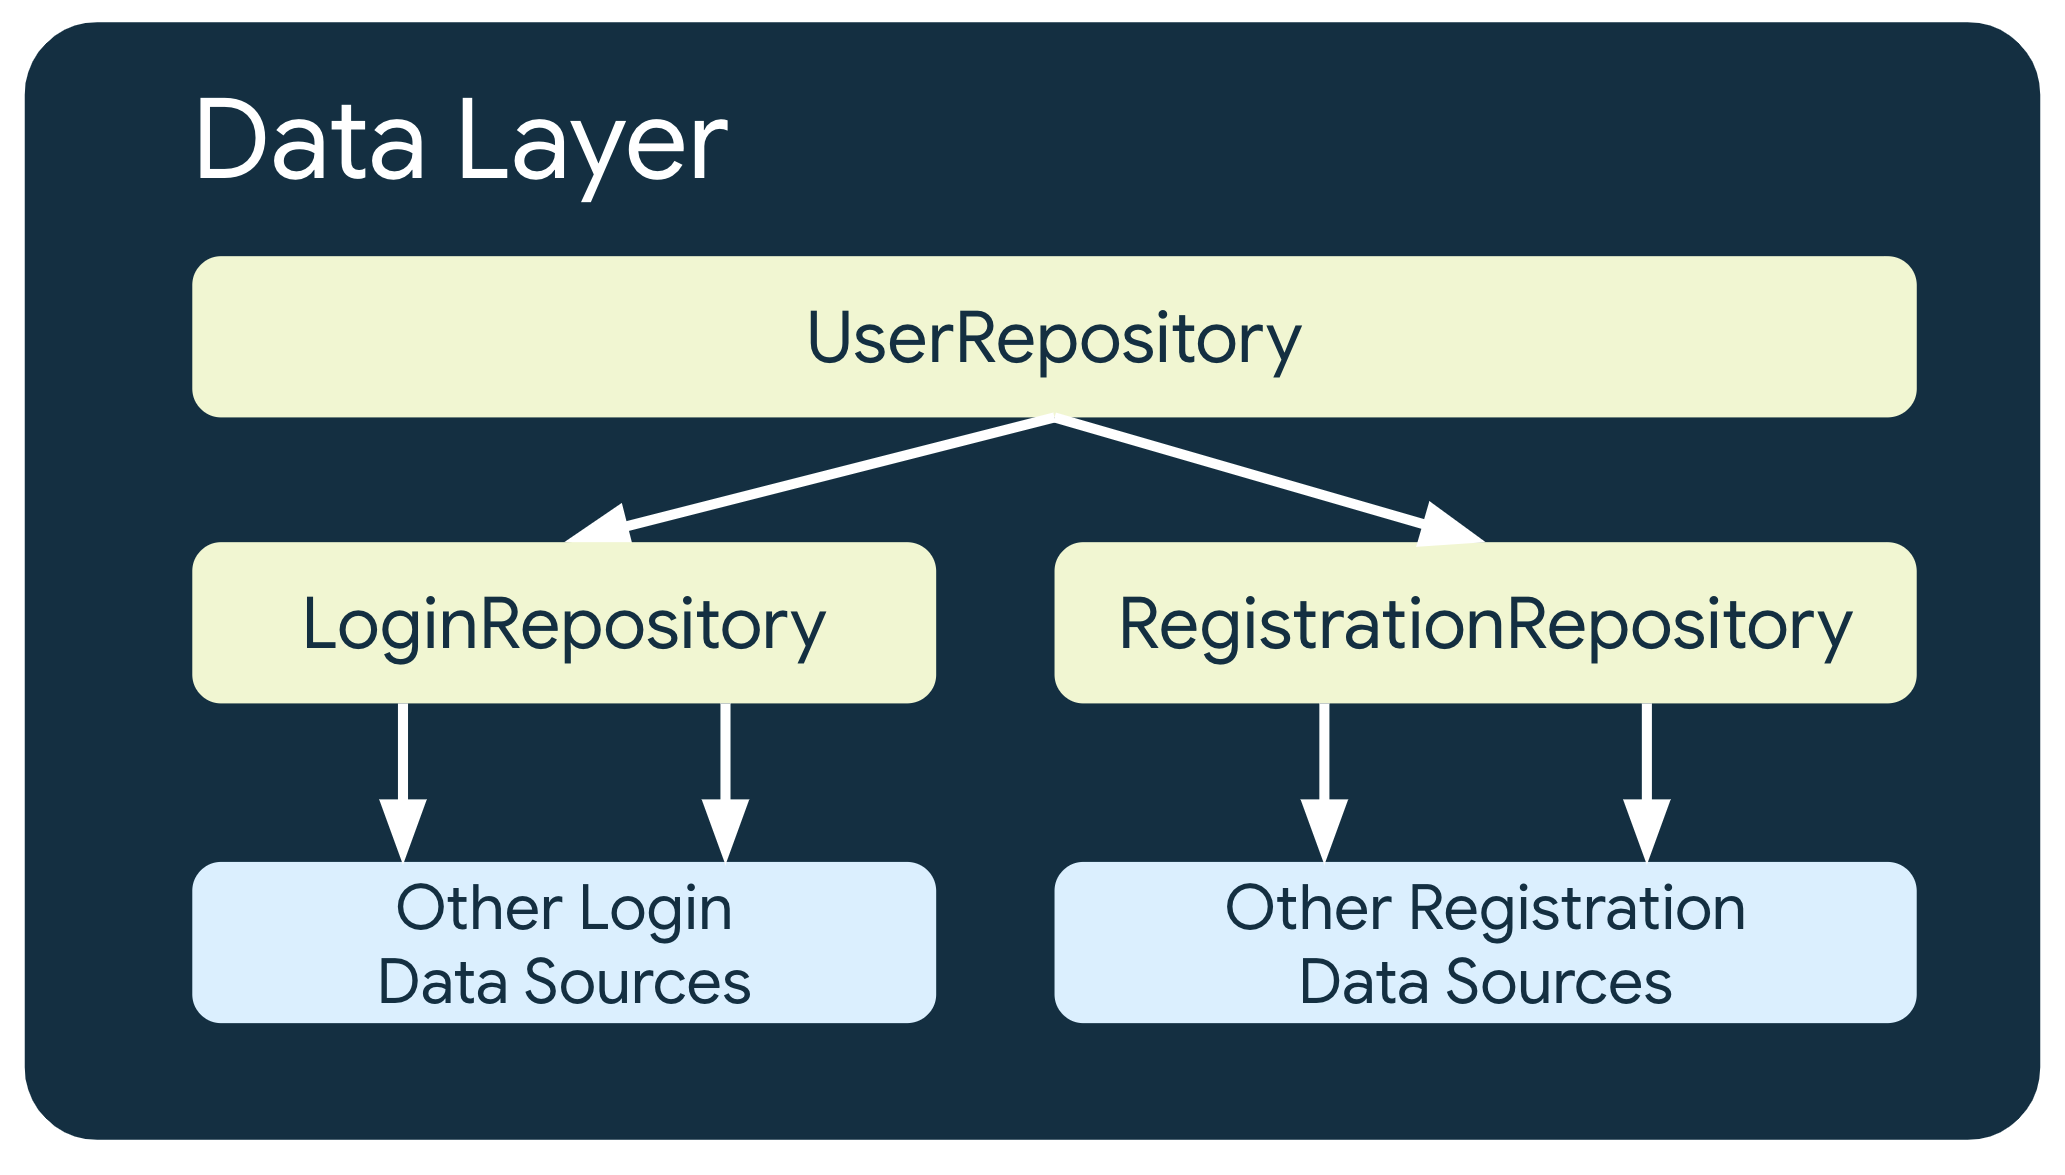
It is reasonable to have an abstraction, that shades where the data comes from, from a server or from a local database on the device. This abstraction is the repository.
"Repository classes are responsible for the following tasks:
- Exposing data to the rest of the app.
- Centralizing changes to the data.
- Resolving conflicts between multiple data sources.
- Abstracting sources of data from the rest of the app.
- Containing business logic." Data Layer
In dart, it is very simple, as each class in dart defines inherently an interface. Thus, you can exchange the data source easily. In addition, you can fake it for automatic tests.
13.4.6 Event Loop
Dart is single threaded. However, with Isolates, you have light weighted threads. Every event driven framework has an event loop. Events are a tap, a swipe or any other user interaction. The event loop must also handle returns/callbacks e.g. after loading data from a network.
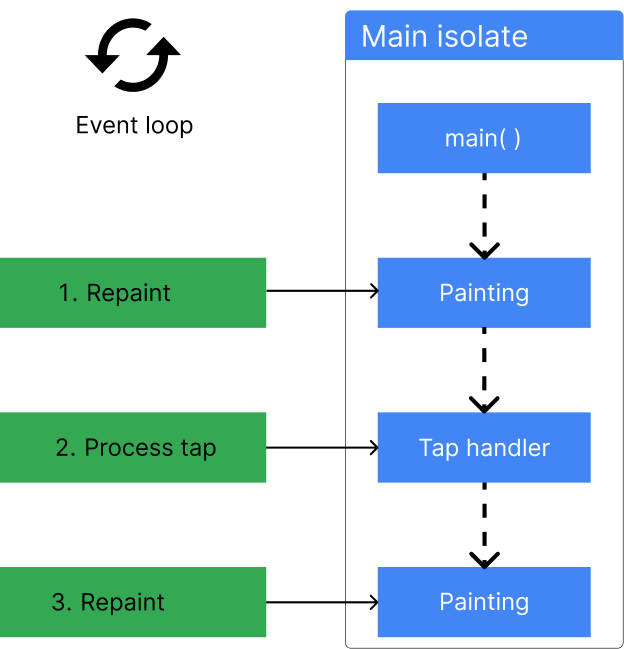
The event loop runs in the main isolate. For smooth rendering, Flutter adds a "paint frame" event to the event queue 60 times per second (for a 60Hz device). Hence, it is important to use asynchronous programming for everything that takes longer than 1/60 s. Otherwise, the UI will jank.
The event loop consists of two queues, for more details see The Event Loop and Dart.
13.4.7 Reactive Programming
"In computing, reactive programming is a declarative programming paradigm concerned with data streams and the propagation of change." Wikipedia
The propagation of change and the redrawing of the UI is a major issue.
Streams may be associated with a stream of data. You might know streams from reading files from a file system. You could also think of real time applications like a chat app, where you get a stream of messages. "A stream is a sequence of ongoing events (state changes) ordered in time. Streams can emit three different things: a value (of some type), an error, or a "completed" signal. The events are captured asynchronously, by defining a function that will execute when a value is emitted, another function when an error is emitted, and another function when 'completed' is emitted. "Listening" to the stream is called subscribing. The functions we are defining are observers. The stream is the subject (or "observable") being observed." IBM
The widget and element trees are sometimes described as reactive, because new inputs provided in a widget’s constructor are immediately propagated as changes to lower-level widgets by the widget’s build method, and changes made in the lower widgets (for example, in response to user input) propagate back up the tree using event handlers. Aspects of both functional-reactive and imperative-reactive are present in the framework, depending on the needs of the widgets. Widgets with build methods that consist of just an expression describing how the widget reacts to changes in its configuration are functional reactive widgets (for example, the Material Divider class). Widgets whose build methods construct a list of children over several statements, describing how the widget reacts to changes in its configuration, are imperative reactive widgets (for example, the Chip class). What programming paradigm does Flutter’s framework use?
13.5 Navigation
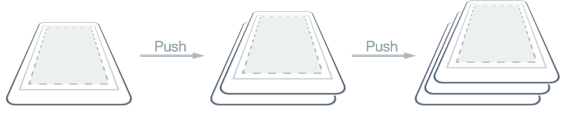
In mobile apps you have a small screen and hence in general many screens you navigate to and from. We distinguish between root navigation, i.e. screens that are a start, e.g. those reached by the bottom navigation. And the navigation stack. When one page navigates to another, the new page is pushed on the stack and becomes the active page. When the second page returns back to the first page, a page is popped from the stack, and the new topmost page then becomes active, see the figures below.

13.6 Design to Code
In this chapter I want to guide you through the process to realize a given Figma prototype into Flutter code.
There are some tools supporting a visual design with drag & drop of UI elements and generating code from this visual design, there are even some plugins for Figma to generate Flutter code. However, the generated code is mostly complicated, difficult to understand and to adapt or extend. In many frameworks the approach of hot reload is used instead.
Case Study
A case study may be found in the article How Flutter facilitates collaboration between designers and developers.
13.6.1 New Project

For every new project start with the following
- create a new project, see also codelab first app
- give it a good name
- choose the namespace, typically your domain backwards with your project, e.g. de.h_da.fbi.hci.fitness -- no - allowed.
- adapt VS Code for flutter, e.g. use settings
- adapt the analysis options to have a stricter automatic code check
- use analysis_options.yaml or even stricter analysis_options using the package very_good_analysis
- create a folder structure similar to the one in the figure above
- add internationalization
- add loc extension methods from Simplified Flutter Localization using a BuildContext extension and
nullable-getter: falsetol10n.yaml. - add logging
- define your theme
- Use themes to share colors and font styles
- Material Theme Builder -- with an export to flutter, see figure below.
- flex_color_scheme and the playground
- very good flutter styles - generate Flutter theme code directly from the color and text styles in your Figma document
- Advanced Theming Techniques in Flutter: Leveraging Extensions for Dynamic UIs
- add your launcher icon
- Add a NavigationBar for primary destinations. And use Navigator for nested navigation. With Navigator it is possible to pass arguments and return values while navigating. If this approach is not sufficient switch to go_router.
- Add a test screen to you primary navigation. Here you can add single widgets or group of widgets and use hot reload to reach your final design.

Next start to implement the UI of your screens and Figma components.
App Initialization
For real apps check out the article How to Build a Robust Flutter App Initialization Flow with Riverpod.
13.6.2 Layout and Widgets
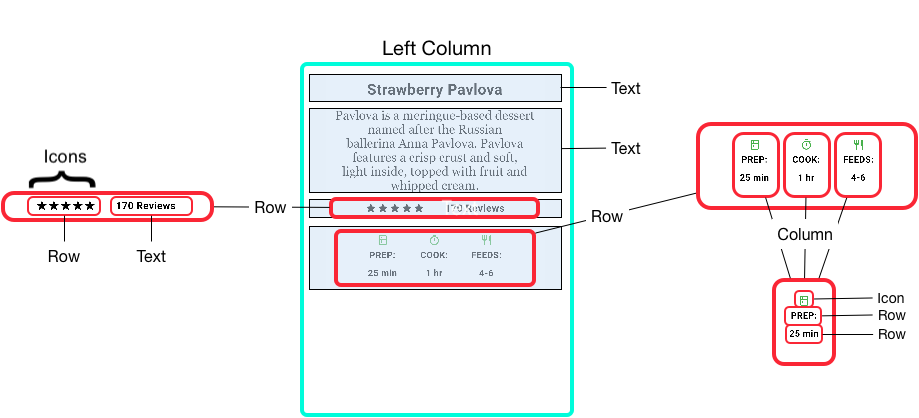
For each screen and component identify rows and cols. Try to work with as less as possible rows and cols.
Now add the widgets according to your design, check the widget catalog. Define custom widgets for each component of your Figma design. Before you start to copy & paste widgets in your code, extract them to a custom widget.
Use the Flutter inspector (devtools or the icon on the right of your debugger) to play with settings of your widgets

Further reading
13.6.2.1 Constraints and Overflowed problems
Make sure, you understand the constraints options and make them work for you.
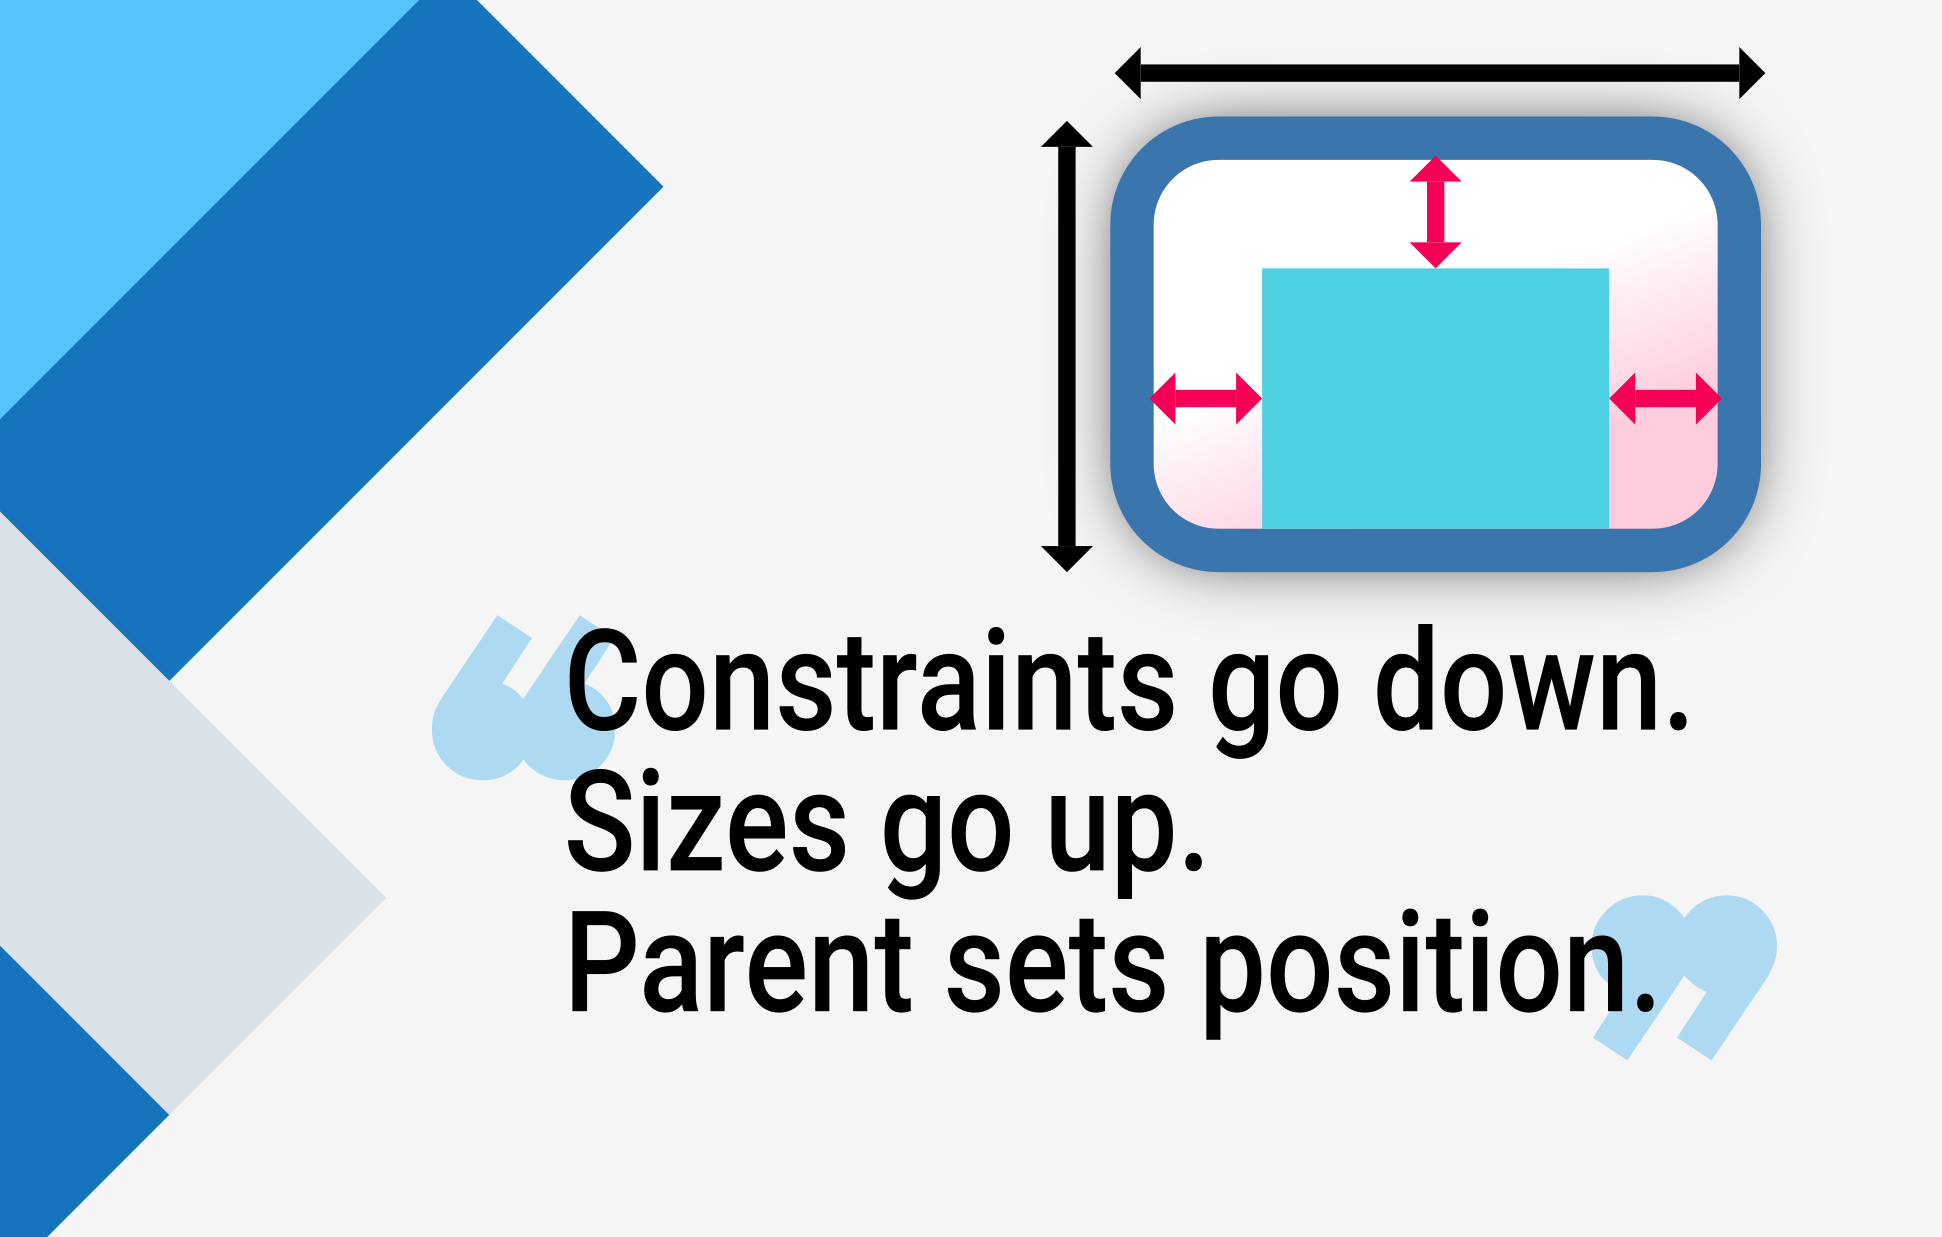
 "The error often occurs when a Column or Row has a child widget that isn’t constrained in its size."3
It might be sufficient to wrap the control with Expanded.
13.6.3 Data and State
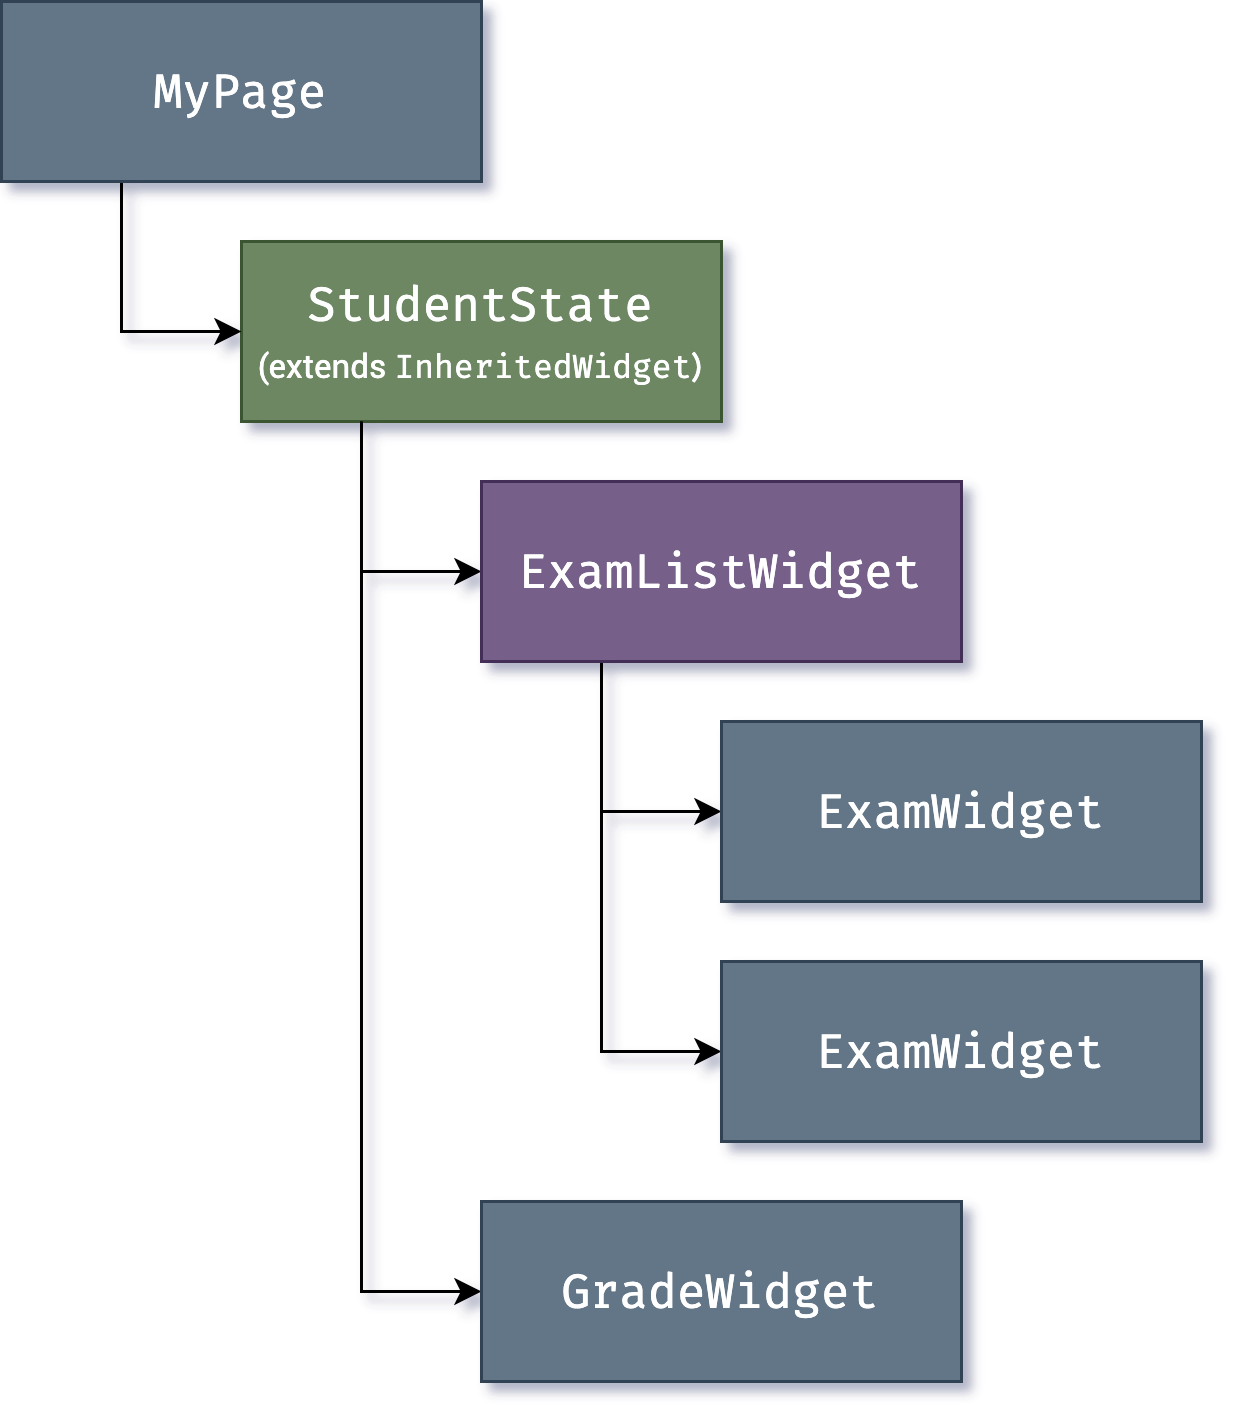
Try to draw a diagram for your data, similar to the one shown below
Each widget that changes its appearance while you use the app, you enter a name, you check a checkbox, you add a favorite, you add a new item to the list needs data. Or someone else adds or changes data on a server, e.g. sends a message in a chat app. Take your digital or paper prototype and have a close look on the data
- From where do you get initial data?
- How may data change/flow?
- while you use the app
- enter some values into a form and click save
- change the selection of a drop-down box
- select an item in a list
- changes on a server due to new sensor values, new chat items of other users, ...
- Which widget should be redrawn due to which data changes?
- Create a sequence diagram for major interactions and events. Start with some major classes and screens.
- Create a birds view class diagram. Start with a class for each screen and when you need states in different screens, split the class.
13.7 Flutter principles
In this chapter we will look at typical programming problems and how they are solved in Flutter.
13.7.1 Libs
There are many packages available at pub.dev. To select a package check for
- last updated -- is it still maintained?
- many contributors -- will it be available in the future, because a company is involved or many people?
- is it popular -- many likes and hence many examples?
13.7.2 Adaptive
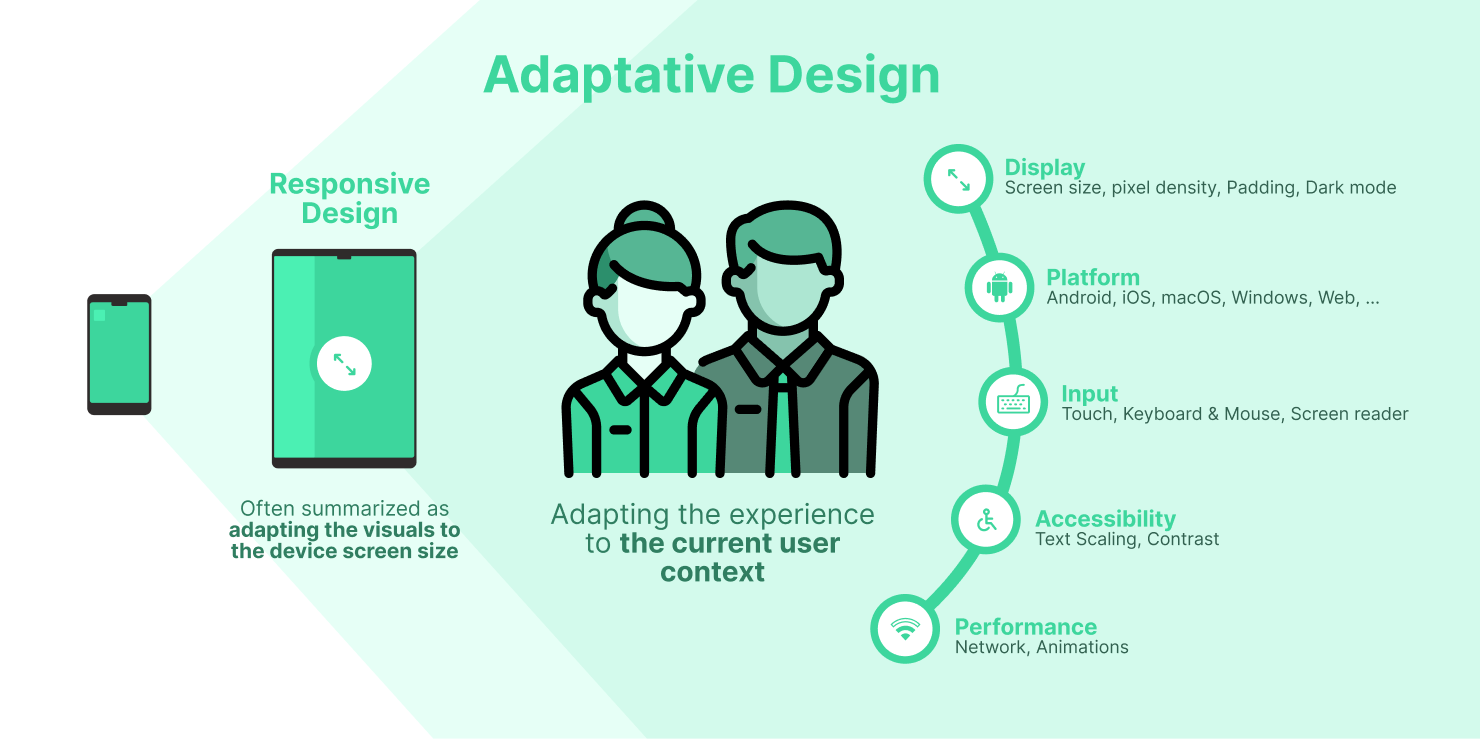
In Flutter there is no easy way to create an adaptive design, i.e. a design that is good for large screens and small screens, for touch and mouse. Basically, you need to program for each device individually and use if-statements to apply one or the other. The following attributes are relevant for your UI
- desktop vs. web vs. mobile
- use adaptive widgets for iOS and material, e.g. Radio.adaptive, for more see Adaptive UI Widgets
- width/height
- screen density or device pixel ratio
- text size, the user might increase the font size for better reading
- left to right or right to left text due to different localization
import 'package:flutter/foundation.dart';

...

if(kIsWeb || Platform.isMacOS || Platform.isLinux || Platform.isWindows) {...}
final size = MediaQuery.sizeOf(context);
if (size.width > 1024) {...}
final devicePixelRatio = MediaQuery.devicePixelRatioOf(context);
if (devicePixelRatio >= 2) {...}
final textScaleFactor = MediaQuery.textScaleFactorOf(context);
final direction = Directionality.of(context);
13.7.3 Accessible

You are responsible to implement an accessible app and hence make the interaction for all better and the life for people with handicap better, see design-accessibility. Consider the following aspects
- color, check the contrast
- font size, check the layout with large fonts
- semantics, wrap your icon buttons etc with the widget Semantics
- target area / hit size
- visual hierarchy, organize the interaction for screen readers
- inspect accessibility with Accessibility Scanner etc.
13.7.4 Persistence
After restarting an app you might need data to be persistent. We distinguish the data on your device (client) from the data shared between devices and or users (server).
13.7.4.1 Client
On the client there are two options to save data on all platforms
- small amount of data may be stored as key-value-pairs using the package shared preferences
- larger amount of structured data should be stored in a SQLite database using the package drift
13.7.4.2 Server
The communication with the server is based on REST and hence typically on https-calls.
Cite
"The HTTP API is CRUD (Create, Retrieve, Update, and Delete):
- GET = “give me some info” (Retrieve)
- POST = “here’s some update info” (Update)
- PUT = “here’s some new info” (Create)
- DELETE = “delete some info” (Delete)
- PATCH = The HTTP method PATCH can be used to update partial resources. For instance, when you only need to update one field of the resource, PUTting a complete resource representation might be cumbersome and utilizes more bandwidth."4
You may either use the dart package http or the package dio with a global configuration and some options to pass data and files more easily.
You need to configure your app to access the internet, see network access for Android or macOS.
Next implement the repository pattern described earlier.
For real time application you might consider to use Firebase.
13.7.5 Asynchronous Programming
The following snippet shows the following principles for asynchronous programming and is a summary of Asynchronous programming: futures, async, await
- Future: A future represents the result of an asynchronous operation, and can have two states: uncompleted or completed.
- async/await: The async and await keywords provide a declarative way to define asynchronous functions and use their results. An async function runs synchronously until the first await keyword. This means that within an async function body, all synchronous code before the first await keyword executes immediately.
Future<void> printOrderMessage() async {
  print('Awaiting user order...');
  var order = await fetchUserOrder();
  print('Your order is: $order');
}

Future<String> fetchUserOrder() {
  // Imagine that this function is more complex and slow.
  return Future.delayed(const Duration(seconds: 4), () => 'Large Latte');
}
For real time applications you will need streams. For further explanations and code snippets see Asynchronous programming: Streams.
13.7.6 Riverpod
State management is a major issue in reactive programs and in flutter. Flutter suggests in its first codelab to use provider.
A provider is basically a piece of state, i.e. you do not want to hold every data relevant for your app in one class, but in several separated parts.
Provider
A provider holds a specific piece of your app's state. Hence, a provider "provides" a specific piece of state to any part of the app, which needs it.
For example, you have a state to handle favorites and a state for contacts and another state for login.
The package provider has some flaws, e.g. it is connected to the widget tree and hence testing is difficult. There exists a more sophisticated package called riverpod, more precisely flutter_riverpod.
"Since riverpod is more flexible than provider and does not rely on the Flutter widget tree to give objects, it can behave more naturally and allow for the representation of more complicated patterns." Unleashing Flutter Riverpod: State Management Mastery
Riverpod addresses the following problems
- UI and Logic Separation
- Asynchronous Requests
- Stream Management
- Data Caching
- Targeted Widget Rebuilding -see How I Simplified Flutter State Management using Riverpod
graph LR
 A[App] --> B[ProviderScope]
 A --> C[ConsumerWidget - Page 1]
 C --ref---> B
 A --> G[ConsumerWidget - Page 2]
 G --ref---> B
 B --- D[repositoryProvider]
 B --- E[state1Provider]
 E --ref---> D
 B --- F[state2Provider]
Sometimes you read, that all providers in Riverpod are global. That is not true, every provider, i.e. every piece of state or every provided object lives in the ProviderScope. ProviderScope stores the state of all the providers we create. We may access providers using the ref-object. To create the connection between the widget tree and a provider you need ConsumerWidget, which gives you a ref-object. Thus, derive your widget from ConsumerWidget and you have access to every provider and you may share objects and data. With the ref-object it is easy to watch for changes of a piece of state and rebuild/redraw the widget with the new value. This ref-object is accessible in each provider so that even outside the widget tree every provider may access every other provider. This ref-object is basically used to read and hence access a specific provider or to observe its state.
You may use Riverpod with its generator or implement it by yourself. I suggest to use the generator.
install riverpod
Follow the instructions to use riverpod.
To use the generator a listener must run to generate the code according to your typing
dart pub run build_runner watch
13.7.6.1 Provider
There are mainly four use cases for provider
- make an object available
- make a changeable single value accessible to different parts of your app: simple state
- implement a controller/viewmodel with state and methods to change the state
- make asynchronous operations
All cases are implemented in the sample application.
13.7.6.1.1 "global object": Provider
The most basic provider gives access to an object, e.g. a repository, a http-connection or a logger, that don't change.
// define the provider, with or without the generator
// final peopleRepositoryProvider = Provider<PeopleRepository>((ref) {
//   return PeopleRepository(dio: ref.read(dioProvider));// declared elsewhere
// });
@riverpod
PeopleRepository peopleRepository(PeopleRepositoryRef ref) =>
    PeopleRepository(dio: ref.read(dioProvider));
13.7.6.1.2 simple state that can change: StateProvider
The most simple piece of state is just an object with a getter and a setter, e.g. you want to change a selected person or a selected city in one widget, e.g. you select an element in a list, and other widgets like details information are related to it. To do so you may define a StateProvider.
// define the provider, with or without the generator
// final currentPersonProvider = StateProvider<Person?>((ref) { return null});
@riverpod
 Person? currentPerson(CurrentPersonRef ref) {
   return null;
}

// set the person
ref.read(currentPersonProvider.notifier).state = person

// observe changes
final state = ref.watch(currentPersonProvider)
The following code shows the counter example with riverpod
// 1. declare a [StateProvider]
final counterProvider = StateProvider<int>((ref) {
  return 0;
});

// 2. create a [ConsumerWidget] subclass
class CounterWidget extends ConsumerWidget {
  @override
  Widget build(BuildContext context, WidgetRef ref) {
    // 3. watch the provider and rebuild when the value changes
    final counter = ref.watch(counterProvider);
    return ElevatedButton(
      // 4. use the value
      child: Text('Value: $counter'),
      // 5. change the state inside a button callback
      onPressed: () => ref.read(counterProvider.notifier).state++,
    );
  }
}
13.7.6.1.3 Controller or ViewModel
To keep the UI and build methods simple, it is recommended to separate the interaction with the data layer and hence repositories. Use the following code to define a controller using the generator
@riverpod
class EditPersonController extends _$EditPersonController {
    @override
    FutureOr<Person?> build() {...}
    // methods calling the repository methods
}

// and in a widget
final state = ref.watch(editPersonControllerProvider);
final controller = ref.read(editPersonControllerProvider.notifier);
Or the counter example (complete code)
@riverpod
class Counter extends _$Counter {
  /// Classes annotated by `@riverpod` **must** define a [build] function.
  /// This function is expected to return the initial state of your shared state.
  /// It is totally acceptable for this function to return a [Future] or [Stream] if you need to.
  /// You can also freely define parameters on this method.
  @override
  int build() => 0;

  void increment() => state++;
}

class Home extends ConsumerWidget {
  @override
  Widget build(BuildContext context, WidgetRef ref) {
    return Scaffold(
      appBar: AppBar(title: const Text('Counter example')),
      body: Center(
        child: Text('${ref.watch(counterProvider)}'),
      ),
      floatingActionButton: FloatingActionButton(
        // The read method is a utility to read a provider without listening to it
        onPressed: () => ref.read(counterProvider.notifier).increment(),
        child: const Icon(Icons.add),
      ),
    );
  }
}
Or a more complex viewmodel with async
@riverpod
class EditPersonController extends _$EditPersonController {
    @override
    FutureOr<Person?> build() {
        state = const AsyncData(null);
        return state.value;
    }
    // async methods to change the state
}
naming convention -- needed by the generator
Function name EditPersonController needs to extend _$EditPersonController.
13.7.6.1.4 Asynchronous operations
Sometimes you do not need a full controller or access to the complete repository, but you just want to fetch a list of movies or a String asynchronously.
@riverpod
Future<String> boredSuggestion(BoredSuggestionRef ref) async {
  final response = await http.get(
    Uri.https('https://boredapi.com/api/activity'),
  );
  final json = jsonDecode(response.body);
  return json['activity']! as String;
}

// watching changes and show loading, error, changes
class Home extends ConsumerWidget {
  @override
  Widget build(BuildContext context, WidgetRef ref) {
    final boredSuggestion = ref.watch(boredSuggestionProvider);
    // Perform a switch-case on the result to handle loading/error states
    return boredSuggestion.when(
      loading: () => Text('loading'),
      error: (error, stackTrace) => Text('error: $error'),
      data: (data) => Text(data),
    );
  }
}
naming convention -- needed by the generator
Function name boredSuggestion needs the parameter BoredSuggestionRef ref.
The when/loading/error-part is needed often. Thus, it is recommended to put it into a custom widget, e.g. AsyncValueWidget.
Riverpod
Basically you need the annotation @riverpod and the naming convention. You do not need to know what provider is generated in the background.
- class based notation
class Counter extends _$Counter - function based notation
Person? currentPerson(CurrentPersonRef ref)
13.7.6.2 Edge cases
Usually the provider lives as long as someone is interested in it, e.g. as long as there is a widget watching it. Sometimes you need to stay the provider alive, to do so use the annotation with a capital R.
@Riverpod(keepAlive:true)
Sometimes, you may want to force the destruction of a provider. This can be done by using ref.invalidate, which can be called from another provider or from a widget.
For everything else read the excellent documentation.
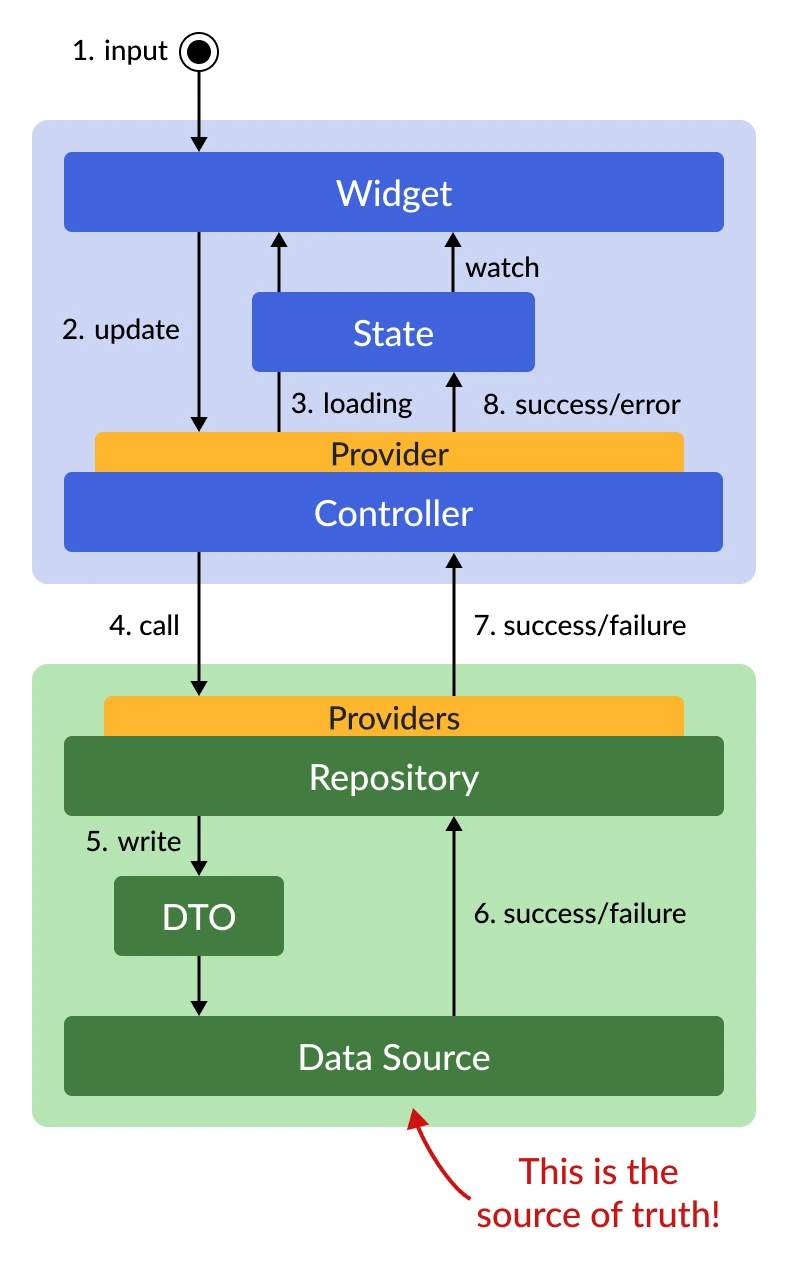
13.8 REST
If your data is not on one mobile device only, but you fetch weather data from a server, exchange data with other users or do CRUD (create-read-update-delete) operations on a database in the cloud or on a server, you will read and write data asynchronously. A proper architecture realizing such an application is shown below.
13.9 Testing
Testing is not covered in this course. Nevertheless, you need it in real apps.
13.10 Packages & VS Code Extensions
The following list was given by Verena Zaiser and complemented by the students during a talk in December 23 at the h_da.
- Preferences
- fix on save and others see settings.json
- Packages & Tools
- patrol - access native features of the platform
- fluttium - user flow testing tool
- faker - generating fake data
- alchemist - make golden testing in Flutter easier
- sentry_flutter - support to native crashes
- VS Code Plugins
- Coverage Gutters - Display test coverage generated by lcov or xml in your editor.
- Awesome Flutter Snippets
- Build Runner
- Dart Barrel File Generator
- Dart Data Class Generator
- Dart Code Metrics
- Flutter Color
- Flutter Coverage
- Pubspec Assist
- Pubspec Dependency
- Version Lens
- Android Studio Extensions
- Other
 Slivers
- Flutter Version Manager
- Firebase Alternatives
- [Supabase](https://supabase.com/
- AppWrite
 Flutter für Dummies
-
Faq. 2024. URL: https://docs.flutter.dev/resources/faq#what-programming-paradigm-does-flutters-framework-use (visited on 15.02.2024). ↩
-
Flutter architectural overview. 2024. URL: https://docs.flutter.dev/resources/architectural-overview#reactive-user-interfaces (visited on 15.02.2024). ↩
-
Common flutter errors. 2024. URL: https://docs.flutter.dev/testing/common-errors#a-renderflex-overflowed (visited on 12.03.2024). ↩
-
Sanjay Patni. Fundamentals of RESTful APIs, pages 1–15. Apress, Berkeley, CA, 2023. URL: https://link.springer.com/chapter/10.1007/978-1-4842-9200-6_1#Sec11, doi:10.1007/978-1-4842-9200-6_1. ↩